This content is for the previous 4th version of Bootstrap
Download the latest Material Design for Bootstrap 5
Get 500+ material UI components, super simple 1 minute installation & much more
Free DownloadManual installation (zip package)
Step 1
Download MDB 4 jQuery Pro package
Step 2
Unzip downloaded package and open it in the code editor
Step 3
Explore our documentation (menu on the left). Choose components you like, copy it to your project and compose your website. And yes, it's that simple!
Note: Manual installation with a .zip package is the
easiest way, but many useful features are not available there.
To use the full potential of MDB and all available options, we recommend
installation through
MDB CLI.
MDB CLI
CLI installation is the most efficient way to use MDB. It enables options such as:
- Free hosting (supports custom domains, SSL, FTP access)
-
Install any MDB package
with a single command


- Easy updates with a single command
- Backend starter templates (Laravel, plain PHP, node.js & more)
- WordPress setup in 3 minutes (blog, ecommerce or blank project)
- Git repository for you and your team
GitHub
You can also download MDB 4 directly from our GitHub.
If you like - please do not forget to support us with your star :)
MDB 4 jQuery GitHubNPM
Prerequisites
Before starting project make sure to install Node LTS (9.x.x or higher recommended).
Step 1
Create new folder for your project and install MDB Free:
npm i mdbootstrap
Step 2
Open the project in the code editor.
Step 3
Generate new GitLab token (see token generation section)
Step 4
Use generated token to install MDB Pro package:
npm install git+https://oauth2:YOUR_TOKEN_GOES_HERE@git.mdbootstrap.com/mdb/jquery/jq-pro.git --save
Step 5
Create index.html file.
Step 6
Import styles inside <head></head> section:
              <link rel="stylesheet" href="https://use.fontawesome.com/releases/v5.11.2/css/all.css">
              <link rel="stylesheet" href="https://fonts.googleapis.com/css?family=Roboto:300,400,500,700&display=swap">
              <link rel="stylesheet" href="node_modules/mdbootstrap/css/bootstrap.min.css">
              <link rel="stylesheet" href="node_modules/mdbootstrap/css/mdb.min.css">
              <link rel="stylesheet" href="node_modules/mdbootstrap/css/style.css">
Step 7
Inside <body></body> section import JavaScript:
              <script type="text/javascript" src="node_modules/mdbootstrap/js/jquery.min.js"></script>
              <script type="text/javascript" src="node_modules/mdbootstrap/js/popper.min.js"></script>
              <script type="text/javascript" src="node_modules/mdbootstrap/js/bootstrap.min.js"></script>
              <script type="text/javascript" src="node_modules/mdbootstrap/js/mdb.min.js"></script>
Step 8
Open index.html on your web browser.
Token generation
Step 1
Visit https://git.mdbootstrap.com and log in. If you are a PRO user, you should receive an email (from GitLab) with an activation link, after purchase (please check your spam folder as well). This email is send to the email address used for billing.
Step 2
From top right corner click at your avatar and choose "Setting → Access Tokens."
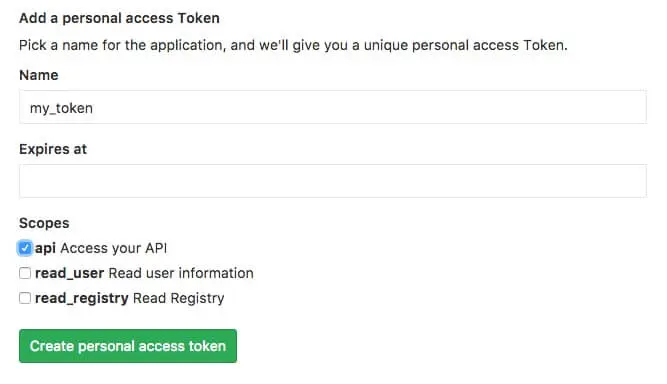
Step 3
Provide a Name for your token and choose "api" from scopes. Then click "Create personal access token"
Step 4
Once your token will be generated make sure to copy it and store in safe place. You won't be able to access it again. In case of lose, you will have to generate new token again.
